Most websites these days are full of clutter, which often gets in the way of the content you’re trying to read. Edward Tufte knows a thing or two about information design and there’s a great project that provides CSS to apply some of those ideas to websites. A little while ago, I knocked together a bookmarklet to allow for distraction free reading of websites using the Tufte styles.
There are plenty of pre-existing solutions out there but I wanted to have ago myself and see how you could apply “modern” web development tools to something as archaic as bookmarklets. Besides, it’s just for fun.
What is a bookmarklet?
A bookmarklet is something that’s been around since the inception of Javascript back in 1995. Instead of a browser bookmark taking you to a website, it uses the javascript: URI scheme to execute some javascript locally instead.
This allows you to enhance browser functionality or modify the currently viewed website without having to go to the hassle of creating a browser extension.
Sadly bookmarklets may go the way of the Dodo as browsers and sites enforce stricter Content Security Policies but while we can still use them, they’re a handy tool.
What is Webpack?
Webpack is a module bundler. This means that it can take a set of source files (such as javascript, html, and css) and their dependencies, then combine them into static assets. We use it quite extensively here at Black Pepper and have written about it previously.
For this project, using Webpack means that I can take my source files and combine them into one minified chunk of javascript that can be included in a bookmark.
How to build a bookmarklet
The bookmarklet will work by getting the current page url and passing that to a service that can extract the readable content.
I’ve chosen to use Mercury for this functionality, which means I’ll need to pass an API key to the service. Then the content will be wrapped in a little html template that references the Tufte CSS and then we’ll tell the browser to display the result.
You can find the full details of the implementation on github. For this article I want to highlight a couple of the core Webpack features that were useful.
Bundle All the Things!
In order to keep the code sane and readable, I split the functionality into several source files:
- index.js - The application entry point. It invokes the mercury client, then inserts the content into the template then tells the browser to display that instead.
- mercury.js - A client to the mercury web service. It needs an API key providing for the request to work.
- xhr.js - a trivial helper class for doing XMLHttpRequest stuff as I didn’t want to pull in a massive library like jQuery.
- tufte.html - The template we use that references the tufte css and has a placeholder for the readable content.
The javascript files require their dependencies which means the webpack config can simply reference index.js:
entry: {
  "tuftey": path.resolve(__dirname, "src", "index.js")
},
Coupled with the output config:
output: {
  path: path.join(__dirname, "dist"),
  filename: "[name].js"
},
this means we’ll end up with one file called tuftey.js that becomes our bookmarklet. This is minified and compressed, thanks to the webpack UglifyJsPlugin.
API Keys as Build Time Environment Variables
The Mercury API requires that we sent a header “x-api-key” that contains our unique key. Obviously, hard-coding this into the bookrmarklet would be a bad idea as it would expose our key to the world via github. Instead, I set it as an environment variable when I build the bookmarklet, and webpack then turns it into a global variable that the mercury.js file uses:
new webpack.DefinePlugin({
  MERCURY_API_KEY: JSON.stringify(process.env.MERCURY_API_KEY)
}),
In mercury.js, references to MERCURY_API_KEY will get replaced with the value of the environment variable of the same name.
As a bonus, you can put a check in your package.json scripts to ensure this environment variable is set before doing the build.
"scripts": {
  "prebuild": ": ${MERCURY_API_KEY:?Mercury API key not specified}",
  "build": "webpack"
},
Installation
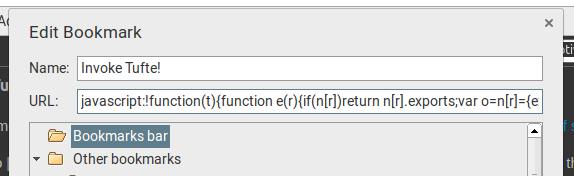
Having created a single file that contains everything the bookmarklet needs, how do you use it? Well, unfortunately this part is entirely manual and very low tech.
The simplest way is to create a normal bookmark on your browser’s bookmark bar, then edit it. You need to replace the URL part with the contents of the tuftey.js file, prepended with “javascript:”
Conclusion
And that’s pretty much it. This has been a trivial example of using webpack, but I quite enjoyed combining the old with the new to produce something that’s been useful to me. I could have gone even further and used newer javascript features from ES2015/ES2016 or even written it all in typescript and transpiled it but I’ll leave that as a future exercise.
I’ve ended up with a simple way to convert from a site like this:
to something with fewer distractions:
There’s certainly room for improvement but it gets the job done. I’d like to create a github pages documentation site that includes an install link (once I’ve figure out how to avoid exposing the API key). Also, now that Webpack 2 has been released, I should migrate to that at some point. Trivial projects like this provide a great way to try out new versions of tools and libraries.
You can read more about my motivations for this project on my personal blog and follow along with any future developments on github.