Something I’ve fancied doing for a while now, is making a camera out of a flatbed scanner. Why? Because it seemed like a good idea at the time. I like cameras; I collect them. I love photography and I love tinkering with things. It all seemed like a good idea at the time.
My first attempt at this was a couple of years ago when I took a HP Photosmart 1200 book scanner and thought to marry it with something like a Lubitel 166U to produce a self-contained, digital Lubi. Sadly this project came a cropper when it became apparent that the HP 1200 wouldn’t work without the light enabled, as it couldn’t complete its initial calibration step [Aside: Scanners calibrate themselves using a block of black and white lines under the scanner glass right at the edge of the mechanism’s movement. The light has to be on for the scanner sensor to see this]. Now, I thought about ways to overcome this - fitting a switch to turn the LED off after calibration seemed the most likely - but put the project on hold to concentrate on other things. Sadly when I returned to it, it seemed that the scanner had been irreversibly damaged by my tinkering and nothing I could do brought it back to life. I’d like to give this another go, but I can’t seem to find another HP 1200 portable scanner anywhere.
Later, whilst reading Make Issue 14, I came across Michael Golembewski’s article about building a camera from a Canon Lide scanner. These scanners are LED based and entirely powered by a USB port, so while they’re not self contained, they can be powered by a laptop so are fairly portable.
I got myself a LiDE 20 scanner from ebay for £15 and set to work. I first tried Michael’s instructions for a simple scanner camera. This requires no modification to the scanner - you merely make the box and lens assembly to sit on top. Sadly I got no workable results from this, due to the internal light overpowering any image. So I cracked open the scanner and got hacking!

Excessive vignetting due to shadow cast by sensor mount.
[Note: I don’t have any pics of the build process but next time I open it to tinker, I’ll stage some appropriate ones.] The scanner is very simple to open; there are no screws. Instead you simply peel up two strips of plastic on each side (held down with double sided tape) and then slide the glass out. This also means that when you put the scanner back together, a touch of duct tape will hold it in place. I open and close mine quite a bit while tinkering so this ease of access is a real boon. Now, I won’t go in to too much detail about the actual scanner modification, as you can read it on Michael’s site or in Make. However, I will say you really need to take the time to cut away the sensor housing to let more light in. If you don’t you end up with excessive vignetting.
Also, whilst I followed the instructions for masking the metal rod to prevent internal reflections, I still get a massive white line in my images. I’ll need to do more investigation into this, maybe I’ll spray the inside black.
Internal Reflections
I made the body of my camera out of good old black foamcore board and duct tape - two things no camera hacker should be without! Essentially, I cut a piece of board the size of the scanner glass, with a square hole in the middle. I then built a box open at both ends and one, that would slide over it, open at one end. These form the body and allow for focussing. For the lens, I used a magnifying loupe I had lying around, with an aperture made from black card that I taped over the loupe. I intend to build a better lens but this will do for now. I’m quite pleased with the results, aside from the reflection from the metal bar, and look forward to refining the design and taking it out and about. I’ll post more as I go.
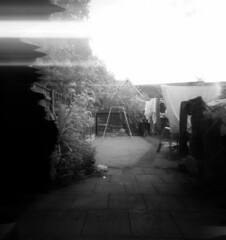
Some sample shots:

I’m massively vain.

Moving whilst taking pictures produces some interesting effects